If you’re an avid kayaker, you know that storing your kayak securely and conveniently can be challenging. Enter the Docksider, our innovative kayak lift system. The Docksider is designed to simplify the process of launching and storing your kayak, making your time on the water more enjoyable and less of a hassle. In this blog post, we will guide you through the installation and show you how easy it is to get started with the Docksider Kayak Lift and Dock Rack.
Why Choose the Docksider?
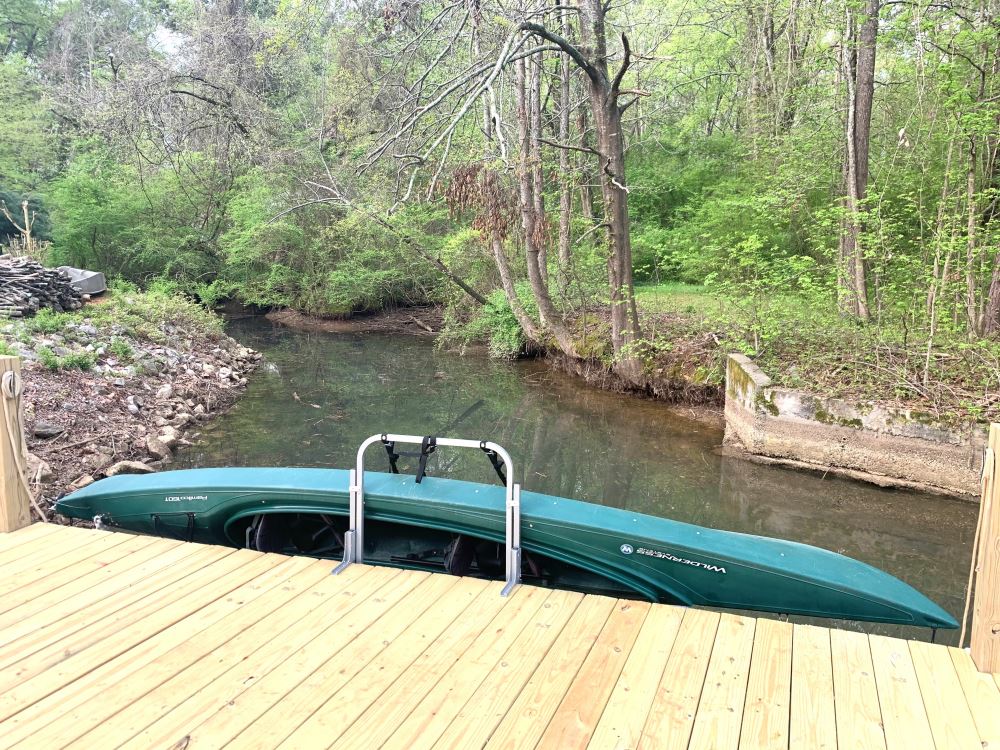
1. Convenience: The Docksider allows you to easily launch your kayak and retrieve it from the water when you’re done. No more struggling to lift your kayak out of the water or worrying about it being damaged during storage.
2. Durability: Made with rustproof marine-grade aluminum, the Docksider is designed to withstand all types of weather and provide long-lasting performance.
3. Easy to Use: The Docksider is easy to install with straightforward instructions and even easier to use. Effortlessly lift and lower your kayak into and out of the water each time.
4. Benefits:
– Free up valuable dock space!
– Lift with a fraction of the weight with the leverage design!
– Store your kayak right where you need it, on the side of your dock!
Mounting the Docksider:
You have two primary mounting options: the clamp-on mount and the bolt-on mount. Each has its advantages depending on your specific needs, dock type, and installation preferences.
Clamp-On Mount
The clamp-on mount is designed to attach to the edge of your dock without the need for drilling holes. It uses adjustable clamps to secure the lift system in place.
Advantages
1. Ease of Installation: The clamp-on mount is generally easier and quicker to install. It doesn’t require drilling, which can save time and effort.
2. Non-Permanent: Since no holes are drilled, this mount can be easily removed or repositioned without leaving permanent marks or damage on your dock.
3. Versatility: Ideal for those who may want to move the lift system between different docks or locations, or if you plan to upgrade or replace your dock in the future.
Considerations
1. Compatibility: Ensure your dock’s edge is suitable for a clamp-on system. The clamps need a stable and accessible edge to grip securely. From the top of your dock to the bottom of the side rail, the height can be no less than 2 ½ inches and no greater than 7 ½ inches.
2. Stability: While clamp-on mounts are secure, they might not be as secure as bolt-on mounts. It’s like killing a fly with a fly swatter compared to a sledgehammer. They both do the job!!
Bolt-On Mount
The bolt-on mount is a more permanent solution that involves drilling holes into your dock and securing the lift system with bolts. To remove, all you have to do is remove the 4 screws.
Considerations
1. Installation Effort: Installing a bolt-on mount requires more effort and tools, including drilling and precise measuring. It’s a fixed-position installation.
2. Dock Impact: Drilling holes in your dock will leave holes in your dock. If you plan to change the location of your lift system, you’ll need to drill new holes in the new mounting position.
Step-by-Step Installation Guide
Step 1: Choose the Perfect Location
Select a spot on your dock where the water is deep enough for your kayak and easily accessible. Ensure there is enough space to maneuver your kayak in and out of the lift system.
Step 2: Assemble the Docksider
Unpack your Docksider kit and review the included instruction manual. Assemble the main components of the lift system according to the provided diagrams. This typically involves attaching the lift arms and handle.
(If you are using the clamp-on mount, skip steps 3 & 4)
Step 3: Secure the Mounting Brackets
Using your measuring tape, mark the locations for the mounting brackets on your dock. Drill pilot holes for the screws, then securely fasten the brackets using the provided hardware. Ensure the brackets are level and aligned properly.
Step 4: Install the Lift System
Attach the Docksider Cradle Assembly to the mounted brackets (already installed). Slide the Clevis Pins on the Cradle Assembly into the designated slots of the mounting brackets. Then secure the Cradle to the Mount with 2 more clevis pins provided. This step may require a helper to hold the system in place while you install it.
Step 5: Test the System
Before placing your kayak on the lift, test the Docksider by raising and lowering the cradle a few times. Make any necessary adjustments to ensure smooth operation.
With your Docksider Kayak Lift and Dock Rack installed, you are ready to enjoy hassle-free kayaking. Whether you are getting your kayak into the water or lifting it out after a day of paddling, Dockcraft makes it easy. Happy Kayaking!