• MY ACCOUNT
  • 0 items - $0.00

The Docksider


Our Dock Mounted Kayak Lift Rack
  • Home
  • Shop
    • Kayak Dock Lift & Storage
    • Paddleboard / SUP Dock Lift & Storage
    • Canoe Dock Lift & Storage Rack
    • Wall Mount Kit
    • Parts
  • About The Docksider
    • Testimonials
    • FAQS
    • How To Choose the Right Docksider
    • Assembly & Installation
    • Customer Installations
    • Must see Videos!
  • About Us
    • Our Philosophy
    • Our Brochure
  • Blog
  • Contact

February 9, 2025 by Ed Wrobbel Leave a Comment

Kayaking Essentials: What You Need When You’re on the Water

Kayaking is an exciting way to explore the outdoors, but being prepared is key to ensuring a safe and enjoyable trip. Whether you’re paddling on a calm lake, winding through a river, or heading out on the open ocean, having the right gear can make all the difference. Before you hit the water, double-check that you have these essentials
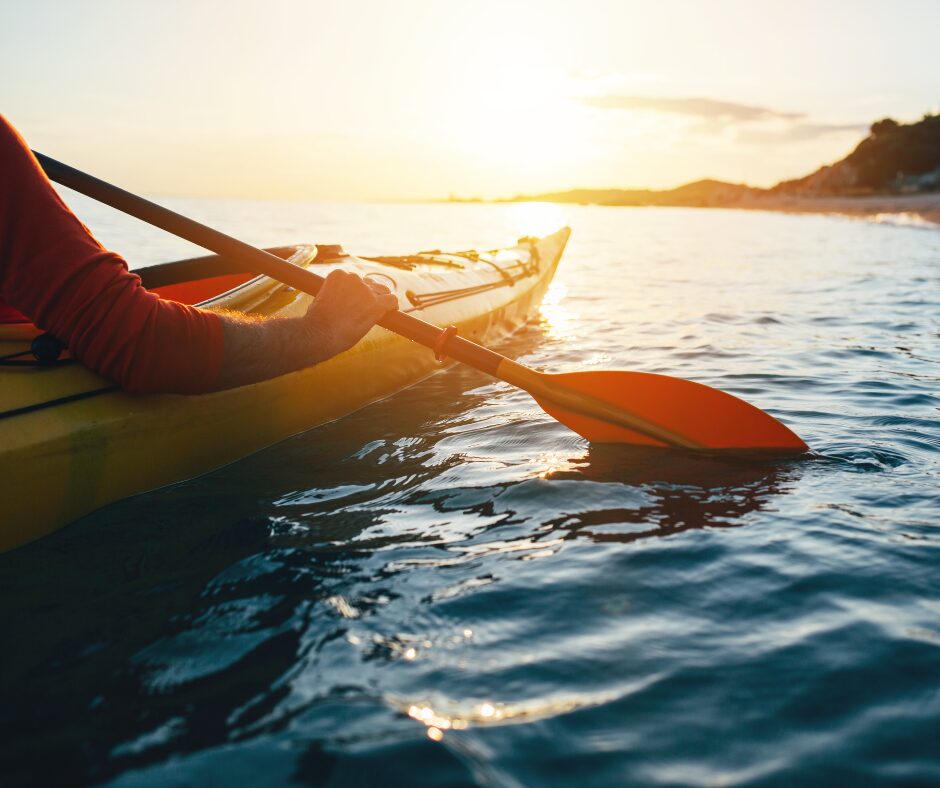
1. Kayak Paddles

It’s a smart idea to carry a spare paddle, especially on longer or more remote trips. A folding or collapsible paddle is easy to store and can be secured to the front of your kayak. If you lose your main paddle due to rough water or an unexpected capsize, having a backup can prevent you from being stranded.

2. Life Jacket/ Personal Flotation Device

    A Coast Guard-approved PFD is a non-negotiable safety essential. It should fit snugly yet comfortably, allowing you to move freely while paddling. Even strong swimmers should wear one at all times—you never know when you might end up in the water.

    3. Sun Protection

    Sunscreen, sunglasses, and a hat are important for protecting your skin from UV rays, especially on the water where the reflection can intensify the effects of sun damage. A long-sleeved UV-protective shirt can also help prevent sunburn.

    4. Dry Bag

    A waterproof dry bag keeps your valuables—such as your phone, keys, extra clothes, and snacks—safe and dry. Even if you don’t plan on flipping, splashes and unexpected rain can still soak your gear. Make sure to test your dry bag for leaks at home by placing a dry paper towel in the bag and submerging it to see if it stays dry.

    5. Whistle

    A whistle is a simple yet crucial piece of safety gear. In many places, it’s legally required for kayakers. Use it to signal for help or alert nearby boats of your presence, especially in low-visibility conditions.

    6. Light Source

    If you plan to be out near dusk or after dark, a waterproof flashlight or headlamp is essential to help you see and be seen. Many states require kayakers to have a light source to alert other boats that they are near. Kayaks are very low to the water making it hard to see from a boat and nearly impossible to see when it’s dark. 

    7. Weather Appropriate Clothing

    Dress for the water temperature, not just the air temperature. Quick-drying, moisture-wicking layers work best. In colder waters, consider wearing a wetsuit or dry suit to prevent hypothermia in case of an unexpected swim. Always be prepared to get wet! 

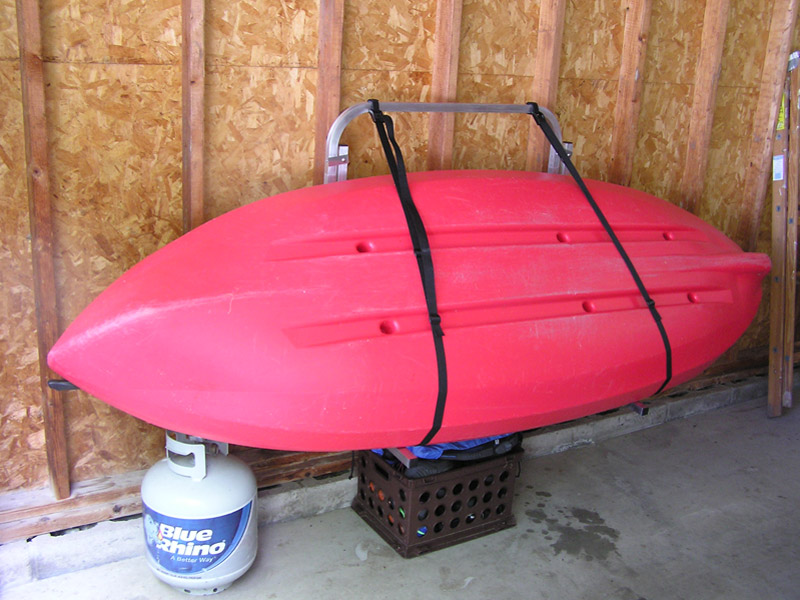
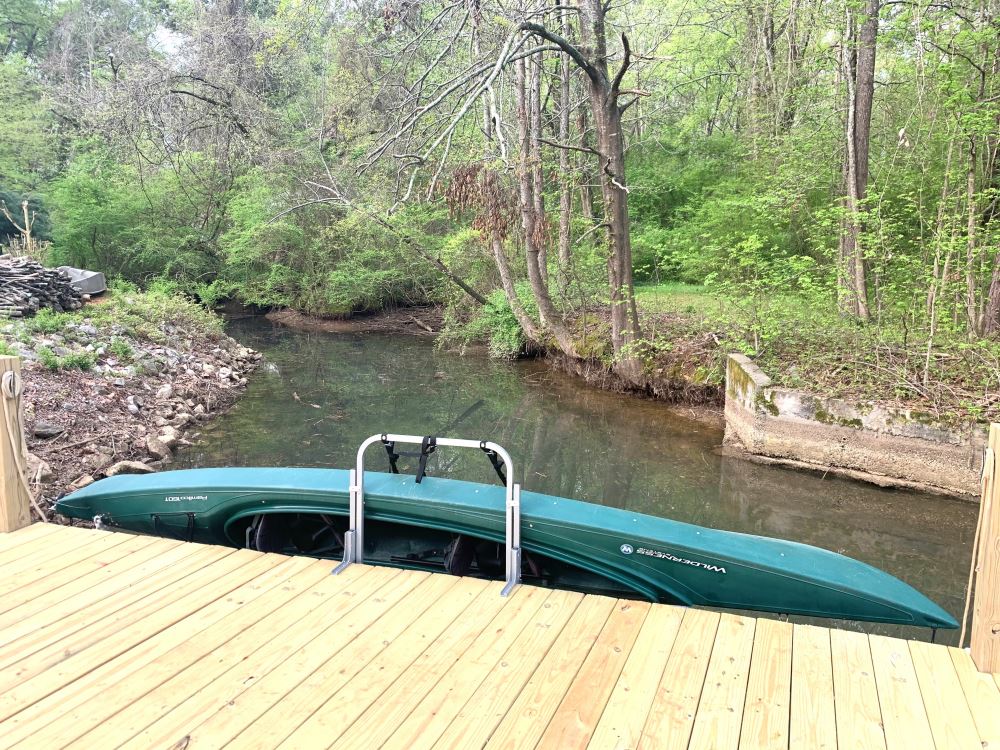
    8. A Way to Store Your Kayak

    Having easy access to your kayak will help you get out on the water more frequently since it isn’t a hassle to use. The Docksider is a great solution for storing your kayak, whether you have a dock or a free wall in your garage or shed that you can mount your kayak to, the Docksider makes it easy to load and unload your kayak so you can get back on the water quicker. 

    Packing the right gear can make your kayaking trip safer and more enjoyable. Always check the weather forecast before heading out, let someone know your paddling plan, and stay aware of your surroundings. Whether you’re a beginner or an experienced paddler, these essentials will keep you prepared for any adventure on the water.

    Filed Under: Blog, Kayak

    October 24, 2024 by Ed Wrobbel Leave a Comment

    How to Store Your Kayak for the Off-Season

    Wall Mount Conversion Kit

    As kayaking season winds down, it’s important to take steps to properly store your kayak for the off-season. Improper storage can lead to damage that shortens the lifespan of your kayak, but with the right techniques, you’ll be able to enjoy your boat for many years to come. 

    1. Avoid Exposure to Sunlight, Moisture, and Extreme Temperatures

    Sunlight and UV rays can cause your kayak’s material to degrade, especially if it’s made of plastic. Likewise, extreme temperatures—whether hot or cold—can warp or crack the hull, while moisture can lead to mold and mildew. If possible, store your kayak in a cool, dry place, away from direct sunlight.

    • Indoor Storage

    If you have room in your garage, shed, or basement, indoor storage is the best option. It protects your kayak from both weather and temperature extremes. Make sure the area is dry and ventilated to prevent condensation from building up around your kayak.

    • Outdoor Storage

    If indoor storage isn’t an option, be sure to cover your kayak with a weather-resistant tarp. Ensure the tarp is loosely fitted to allow airflow and prevent mold.

    2. Keep Your Kayak Off the Ground to Protect the Hull

    Storing your kayak directly on the ground can cause the bottom of the boat (hull) to deform under its weight. Prolonged pressure can also lead to cracks over time.

    Consider the Wall Mount Rack Kit to transform your Docksider Lift & Storage Rack for wintertime storage. This kit allows you to easily store your kayak inside a garage, shed, or cottage, away from harsh winter weather. Keeping your kayak off the ground and out of the elements helps extend its life and ensures it’s ready for action come spring.

    3. Clean Your Kayak Thoroughly Before Storage

    Dirt, grime, and saltwater can cause long-term damage to your kayak’s exterior if left untreated. Before storing your kayak for the winter, clean it with fresh water to remove any debris, especially if you’ve been paddling in saltwater environments.

    Once clean, let your kayak dry completely to prevent moisture buildup during storage. Any lingering moisture can lead to mold, mildew, or rust on metal components, so be sure to store your kayak only when it’s fully dry.

    4. Add UV Protection for Outdoor Storage

    If you must store your kayak outside or in a spot that gets some sunlight (like near a window), applying a UV protectant can help shield it from the sun’s damaging rays. Many marine-grade UV protectants are designed to work on the materials used in kayaks, such as polyethylene, fiberglass, and even inflatable models.

    Properly storing your kayak for the off-season is essential to maintaining its condition and performance. Using the Wall Mount Rack Kit, you can easily take your kayak from dockside to inside, keeping it safe from the winter weather. 

    Filed Under: Blog, Kayak, Uncategorized, Winter Tagged With: Kayak, kayak storage

    May 30, 2024 by Ed Wrobbel Leave a Comment

    Installing a Kayak Lift System: DockCraft Makes It Easy!

    Docksider Kayak Lift System in action

    If you’re an avid kayaker, you know that storing your kayak securely and conveniently can be challenging. Enter the Docksider, our innovative kayak lift system. The Docksider is designed to simplify the process of launching and storing your kayak, making your time on the water more enjoyable and less of a hassle. In this blog post, we will guide you through the installation and show you how easy it is to get started with the Docksider Kayak Lift and Dock Rack.

    Why Choose the Docksider?

    1. Convenience: The Docksider allows you to easily launch your kayak and retrieve it from the water when you’re done. No more struggling to lift your kayak out of the water or worrying about it being damaged during storage.

    2. Durability: Made with rustproof marine-grade aluminum, the Docksider is designed to withstand all types of weather and provide long-lasting performance.

    3. Easy to Use: The Docksider is easy to install with straightforward instructions and even easier to use. Effortlessly lift and lower your kayak into and out of the water each time.

    4. Benefits:

    – Free up valuable dock space!
    – Lift with a fraction of the weight with the leverage design!
    – Store your kayak right where you need it, on the side of your dock!

    Mounting the Docksider:

    You have two primary mounting options: the clamp-on mount and the bolt-on mount. Each has its advantages depending on your specific needs, dock type, and installation preferences.

    Clamp-On Mount

    The clamp-on mount is designed to attach to the edge of your dock without the need for drilling holes. It uses adjustable clamps to secure the lift system in place.

    Advantages

    1. Ease of Installation: The clamp-on mount is generally easier and quicker to install. It doesn’t require drilling, which can save time and effort.

    2. Non-Permanent: Since no holes are drilled, this mount can be easily removed or repositioned without leaving permanent marks or damage on your dock.

    3. Versatility: Ideal for those who may want to move the lift system between different docks or locations, or if you plan to upgrade or replace your dock in the future.

    Considerations

    1. Compatibility: Ensure your dock’s edge is suitable for a clamp-on system. The clamps need a stable and accessible edge to grip securely. From the top of your dock to the bottom of the side rail, the height can be no less than 2 ½ inches and no greater than 7 ½ inches.

    2. Stability: While clamp-on mounts are secure, they might not be as secure as bolt-on mounts. It’s like killing a fly with a fly swatter compared to a sledgehammer. They both do the job!!

    Bolt-On Mount

    The bolt-on mount is a more permanent solution that involves drilling holes into your dock and securing the lift system with bolts. To remove, all you have to do is remove the 4 screws.

    Considerations

    1. Installation Effort: Installing a bolt-on mount requires more effort and tools, including drilling and precise measuring. It’s a fixed-position installation.

    2. Dock Impact: Drilling holes in your dock will leave holes in your dock. If you plan to change the location of your lift system, you’ll need to drill new holes in the new mounting position.

    Step-by-Step Installation Guide

    Step 1: Choose the Perfect Location

    Select a spot on your dock where the water is deep enough for your kayak and easily accessible. Ensure there is enough space to maneuver your kayak in and out of the lift system.

    Step 2: Assemble the Docksider

    Unpack your Docksider kit and review the included instruction manual. Assemble the main components of the lift system according to the provided diagrams. This typically involves attaching the lift arms and handle.

    (If you are using the clamp-on mount, skip steps 3 & 4)

    Step 3: Secure the Mounting Brackets

    Using your measuring tape, mark the locations for the mounting brackets on your dock. Drill pilot holes for the screws, then securely fasten the brackets using the provided hardware. Ensure the brackets are level and aligned properly.

    Step 4: Install the Lift System

    Attach the Docksider Cradle Assembly to the mounted brackets (already installed). Slide the Clevis Pins on the Cradle Assembly into the designated slots of the mounting brackets.  Then secure the Cradle to the Mount with 2 more clevis pins provided. This step may require a helper to hold the system in place while you install it.

    Step 5: Test the System

    Before placing your kayak on the lift, test the Docksider by raising and lowering the cradle a few times. Make any necessary adjustments to ensure smooth operation.

    With your Docksider Kayak Lift and Dock Rack installed, you are ready to enjoy hassle-free kayaking. Whether you are getting your kayak into the water or lifting it out after a day of paddling, Dockcraft makes it easy. Happy Kayaking!

    Filed Under: Blog, Kayak Tagged With: Dock Storage Racks, dockracks, Kayak, kayak storage

    January 23, 2024 by Ed Wrobbel Leave a Comment

    How to Paddle a Kayak for Optimal Performance

    If you want to get the most out of your kayaking experience and achieve optimal speed while expending minimal effort, you need to focus on good stroke technique. Having a good stroke will not only make you more efficient in the water but will save your arms from getting tired as quickly. Here are some pointers to get you moving: 

    How to Hold the Paddle

    Look at the blades of your paddle. You will notice that there is a slightly longer side of the blade. This long edge of the blade should be on top. You will also notice that the blade isn’t perfectly flat, there is a scooped side. This scooped side should be facing you to help propel you through the water. 

    Now that you know how the blade should look, it’s time to learn how to hold the paddle. A helpful tip for getting the right-hand placement on the paddle is to rest the paddle on your head and move your arms until they sit at a 90-degree angle, like a goal post. Feel free to differ your hand placement while kayaking until it feels comfortable to you. Doing so will work different muscles in your arms and can help keep your arms from fatiguing as quickly. Lastly, it is best to keep a light grip on the paddle as it is better for your joints and allows your wrists to stay straight. 

    Using a Forward Stroke 

    Once you have your hand placement down, it’s time to start moving. Place the blade of the paddle in the water near your foot. Twist your torso over to the side of the submerged blade and use your core to push yourself through the water. Pull back with your other hand as you move forward. You know it is time to switch sides when the blade in the water lines up with your hip. Your core is a larger muscle group than your arms; let it do most of the work, otherwise, you will tire out your arms very quickly. Also, having a good upright posture will help keep you balanced in your kayak and ensure you are utilizing your core muscles properly.

    Changing Directions Without Losing Speed

    A sweep stroke is used to help you steer the kayak or slightly change directions. To do this, lean forward in the kayak while maintaining your balance. Put your blade in the water in front of you and make a large sweeping motion, ending towards the rear of your kayak. It is helpful to follow the paddle with your eyes to make sure you are moving your paddle as far back as you can. 

    How to Stop Your Kayak

    To stop your kayak, you will need to use a reverse stroke. To do this, place the blade of the paddle behind you towards the rear of your kayak. Use your core to push the paddle forward, pulling back with your other arm. Do this on both sides to slow yourself down. This can also be used to propel you backward in the water. 

    Paddling a kayak takes practice, but mastering these techniques is worth the effort. By using an overhand grip, engaging your core muscles, and keeping your paddle perpendicular to the water, you’ll find yourself moving faster and maintaining your energy for longer. The next time you head out in your kayak, keep these key paddle strokes in mind. Before you know it, you’ll be gliding across the water! 

    Filed Under: Blog, Kayak, Paddlers Tagged With: Kayak

    September 13, 2023 by Ed Wrobbel Leave a Comment

    How to Get in a Kayak from a Dock

    kayaks on a dock

    If you’re new to kayaking or even if you have been kayaking for some time, you know that getting into your kayak from a dock can sometimes be a bit challenging. However, with the right technique and a little practice, you can easily master entering a kayak from the dock and ensure a smooth start to your kayaking adventure. In this guide, we’ll walk you through the steps to get in a kayak from a dock safely and efficiently, using a dock-mounted kayak dock lift to make the process even easier.

    Step 1: Prepare Your Gear

    Before you even think about getting into your kayak, make sure you have all your gear ready. This includes your paddle, life jacket (always wear it!), and any other personal items you want to bring along. Securely attach these items to your kayak or yourself so they won’t accidentally fall into the water during the onboarding process.

    Step 2: Lower Your Kayak into the Water

    Position your kayak parallel to the dock, with the bow (front) facing the open water. Make sure it’s stable and secure. If you’re using a kayak dock lift, this step becomes even simpler as the kayak lift will make it easy to lower your kayak into the water next to the dock as you prepare to step in. Even once in the water, it’s helpful to keep your kayak tied to the dock while you enter.

    Step 4: Position Yourself on the Dock

    Lay your paddle down on the dock behind you for easy reach once you are inside the kayak. Sit down on the dock in front of the seat of your kayak, facing the kayak with your feet inside of or just over the seat. Keep a firm grip on the dock for balance.

    Step 5: Lower Yourself into the Kayak

    Slowly lower yourself and slide into the kayak seat while holding onto the dock for stability. Slide your legs all the way forward until you are comfortable in the seat.

    Step 6: Position Your Feet

    Once you’re seated, position your feet inside the kayak. Your knees should be bent and pressed against the cockpit walls to provide stability. Ensure that your feet are snugly placed on the footrests to maintain proper posture and control.

    Step 7: Adjust Your Gear

    Once comfortably in the kayak, get your paddle from the dock. Double-check that your paddle, life jacket, and any other gear are secure and within easy reach. Ensure that your kayak is floating freely and isn’t wedged against the dock or the kayak dock lift.

    Step 8: Push Away from the Dock

    If you are still tied up to the dock, untie the kayak. Using your hands or paddle, gently push yourself away from the dock. Keep your movements slow and controlled to maintain stability. Once you’re a safe distance from the dock, you can start paddling and enjoy your kayaking adventure!

    Getting into a kayak from a dock might seem intimidating at first, but with practice and the help of a dock-mounted kayak dock lift, it becomes a simple part of your kayaking experience. Remember to prioritize safety by wearing your life jacket, and always take your time to ensure a smooth transition from the dock to your kayak. With these steps in mind, you’ll be coasting over the water in no time, ready to explore the beauty of nature from the seat of your kayak.

    Filed Under: Blog, Kayak

    May 23, 2023 by Ed Wrobbel Leave a Comment

    How to Kayak: For Beginners

    woman kayaking

    Kayaking is a great outdoor activity for people of all ages. These are some things to keep in mind as you begin your kayaking adventures.

    Here are some tips to help you get started:

    Choose the Right Kayak: Select a kayak suitable for beginners, such as a recreational kayak or a sit-on-top kayak. These types of kayaks are stable, easy to maneuver, and provide a comfortable seating position.

    Get the Essential Gear: Always wear a life jacket while kayaking. You may also want to consider getting a waterproof bag for your belongings, proper clothing (quick-drying and sun-protective), and water shoes or sandals.

    Practice Proper Posture and Balance: Sit upright with your back straight and knees slightly bent. Maintain a balanced posture to enhance stability and control over the kayak.

    Learn Basic Paddling Techniques: Familiarize yourself with basic paddling techniques. Hold the paddle with both hands shoulder-width apart, and use a symmetrical stroke, alternating between sides. Practice forward paddling, backward paddling, and turning strokes.

    Find a Good Location: It’s best to start your kayaking journey on calm, flat waters, such as lakes or ponds. Avoid areas with strong currents, high waves, or heavy boat traffic, especially when you’re still learning.

    Start with Short Trips: Begin with shorter kayaking trips to gradually build up your stamina and comfort level on the water.

    Check the Weather Conditions: Check the forecast before heading out. Avoid kayaking in bad weather conditions like strong winds, thunderstorms, or fog. And if it’s going to be sunny, be sure to wear your sunscreen!

    Go with a Friend or Inform Someone: It’s always a good idea to go kayaking with a friend, especially as a beginner. If that’s not possible, let someone know about your planned kayaking trip, including your route and estimated return time.

    Join a Kayaking Group: Consider taking kayaking lessons or joining a local kayaking group. Most areas have local groups that go kayaking together.

    The more time you spend kayaking, the more comfortable you will feel on the water.

    Filed Under: Blog, Kayak

    November 3, 2022 by Ed Wrobbel Leave a Comment

    5 Tips for Kayaking in the Fall

    fall kayaking

    Fall can truly be a magical time – especially out on the water. There are a few things you need to remember, however, to stay safe and have an enjoyable time as you spend time kayaking this fall. 

    Here are a few great tips that should help make your fall kayaking trip a lot safer, a lot more relaxing, and a whole lot more fun!

    Always prioritize safety

    Safety should always be at the top of your priority list when paddling. But even more so, it should be #1 during the cooler months of October and November. The fall can be a wonderful time to kayak but the water is much colder and much more dangerous.

    Water temperatures during these months pose the threat of cold shock, a surefire way to ruin any outdoor excursion.

    Whenever kayaking or paddling, make sure to pack a personal flotation device, have a cell phone secured safely abroad, and paddle with a friend!

    Use light to your advantage

    The sun sets earlier and earlier during the fall. If you wait too long, you’ll run the risk of paddling in the dark, which can make things even more dangerous. To ensure you’ll always have some sort of lighting during your time on the water, consider using the following: deck lights, headlamps, flashlights, or – our personal favorite – kayak in the morning!

    Call before you kayak 

    If you’re renting a kayak, it’s important to know that some places might close earlier in the year or if the weather is a little too rainy, windy, chilly, etc. So make sure you have a plan beforehand. Simply making a quick call can help avoid a big inconvenience.

    However, your best bet is to purchase your very own kayak so you can bust out whenever you want! Then, you’ll be able to keep it safely stored all winter with The Docksider, a dock rack and lift for kayaks, canoes, and paddleboards!

    Wear the right gear and clothes 

    Kayaking in a t-shirt and swimsuit is a great idea… in July. During the fall, that kind of attire is a terrible idea. Instead, make sure you’re wearing enough kind of clothes and the right kind of gear.

    Layering is your friend. Even if you’re too hot or uncomfortable, you can always remove an item or two and throw it back on once it gets cooler. It’s a lot better to take something off and put it back on than it is to shake and shiver the entire trip.

    Also, wearing wicking material and quick-drying fabrics is your best bet to stay warm and comfortable out on the open waters. It’s recommended to never wear cotton material since it’ll trap moisture and potentially lead to some serious problems.

    If it’s too cold, pack it up

    We’ve had an excellent 2022 season of kayaking, no one wants to end it horribly by getting sick paddling on a far-too-cold day. Fall can be crisp, cool, and comfortable. But as winter rears its head it could also be extremely chilly.

    If the weather isn’t right, pack up your kayak and start getting excited about the 2023 paddling season! Curious about kayak storage racks or canoe lifts? Contact DockCraft to learn more about The DockSider, perfect for both shallow and deep water.

    Filed Under: Blog, Kayak

    July 26, 2022 by Ed Wrobbel Leave a Comment

    Kayaking vs Canoeing: 4 Important Differences

    canoe on the water

    We’re right in the middle of summer and that means there is still plenty of sunny days on the way. You’ll have all winter to spend relaxing inside so start making some plans to get outside, get active, and get out on the open water.

    That begs the question: should I use a canoe or a kayak?

    That is a tough one. Firstly, you really can’t go wrong with either. Both are comfortable, are relaxing, and can get you exactly where you need to go. There are, however, a few key differences between the two that you should be aware of.

    1. Seating Design and Comfort

    Kayaks, typically, are closed design and canoes have a much more open layout. Keep in mind, if you’re a much bigger kayaking fan but enjoy having plenty of open space, you’ll be better suited for one of the sit-on-top kayaks — it all depends on your personal preference. Conversely, canoes are much larger, designed for an even more comfortable trip, and great for paddling with a friend.

    2. Amount of Paddlers

    Speaking of paddling with a friend, the amount of people you’re taking out on the water with you matters, as well. If your group of friends is more of a kayaking bunch, that’s a great option. But if you don’t have enough kayaks for everyone to take their own, you’re better off with a canoe or two — maybe even a nice mix of kayaks and canoes! Canoes are specifically designed for tandem purposes and the bigger one you get, the more people you’ll be able to spend the day with.

    3. Canoe and Kayak Storage

    If you’re planning on spending hours on the water on a hot summer day, you’re going to need quite a few items. No paddling trip is complete without some cold beverages, snacks, and a big bottle of sunscreen. Plus, you’ll need to keep your cell phone, wallet, and any safety items you’re bringing along dry and secure during the day. Certain kayaks have compartments that are perfect for storing all those items you want to safely keep from the water and canoes are often big enough to keep everything – even coolers and travel bags – with you in the seat.

    4. Mobility in Water

    Again, it depends on what type of day you’re hoping to have. Both are great for relaxing and slowly floating across the water. But if you’re hoping for a more calming trip, canoes are a little more stable. Kayaks are great for quick movements, turns, and maneuvering around trees, other paddlers, and other obstacles. As far as speed is concerned, both kayaks and canoes can reach the same speed – it just depends on paddle technique and how hard you’re paddling.

    Hopefully, you have a better idea of which to choose. But rest assured, you’re going to have a lot of fun either way. And what about when you’re done paddling for the day? Luckily, both canoes and kayaks can be easily stored while not in use and during the offseason. There are canoe and kayak racks that are perfect for safe and convenient storage.

    If you’re thinking about purchasing some of the best kayak storage racks and canoe lifts around, contact DockCraft to learn more about The Docksider — a dock rack and lift for both kayaks and canoes, as well as paddleboards and SUPs.

    Free shipping in the Continental United States — call today: 585-734-7374

    Filed Under: Blog, Kayak Tagged With: canoe, Kayak

    December 22, 2021 by Ed Wrobbel Leave a Comment

    3 Benefits of Properly Storing Your Kayak Over the Winter

    a lake during winter

    It’s been another successful season of kayaking – we hope you enjoyed being out on the water!

    Now, it’s time to reinforce the importance of correctly storing your kayak over the winter. Neglecting to properly store your equipment can result in some costly issues, frustrating moments, and even a few bad looks from your neighbors…

    The best way to store your equipment is to use a kayak wall storage rack. You can purchase a Wall Mount Conversion Kit for your “DockSider” Rack to hang your kayak inside your garage, in a shed, or in your basement. Rather than just tossing your kayak to the side and leaving it susceptible to all kinds of problems, this is the best way to protect your equipment.

    Here are the main reasons why you should get a wall mount conversion kit in order to keep your kayak secured all winter:

    Prevent Weather-Related Damage

    One of the main reasons to properly store your kayak during the colder months is to avoid seriously damaging your equipment. Severe winter weather can ruin your kayak, causing you to spend a lot of money on repairs or a replacement. It could hail every day for the next few months, but if your kayak is safely secured to your kayak wall hanger inside your garage or shed, you’ll rest easy all winter long. Then, as soon as the ice melts and it’s paddling season once again, bring it back outside and enjoy!

    Avoid Kayak Theft

    Another benefit of using a quality kayak wall storage rack is to prevent theft. If someone really wants to be an awful person and steal a kayak, they’ll have much better luck with someone who lazily keeps their equipment outside all year-round. Not only is a kayak lying next to the garage an eyesore, but it’s also a beacon of light for thieves to take your favorite outdoor item for their own.

    Improve Your Home’s Look

    Again, having a bulky, tarp-covered kayak outdoors all winter does not look great. It looks bad. Your neighbors are going to stare and probably roll their eyes. The same goes for just resting the kayak on your garage floor. It’s going to bother you and probably drive your spouse mad. A kayak wall hanger is great for reducing clutter and boosting your home’s appearance.

    For safely securing your kayak or paddleboard this winter, check out our Wall Mount Conversion Kit for your lift and storage rack — lift and rack sold separately. If you currently own a “DockSider” Rack, these wall mount brackets are great for anyone who wants to keep their kayak protected this winter.

    Don’t leave your kayak unprotected all winter. Contact DockCraft today and ask about our kayak wall mount conversion kit hangers.

    Filed Under: Blog, Kayak, Winter

    August 24, 2021 by Ed Wrobbel Leave a Comment

    Mounting Your “DockSider” with the Wall Mount Rack Kit

    Wall Mount Conversion Kit

    There aren’t too many things that are more fun or more relaxing than kayaking and paddle boarding. A calming, sunny afternoon, good friends, and plenty of peace and quiet. Kayaking and paddle boarding are perfect hobbies for those who enjoy mixing relaxation with some physical activity.

    These outdoor activities are great but the equipment can be difficult to store if you’re not well equipped. You can’t just leave a kayak in your truck bed for months on end and just tossing it in the garage or shed can look terrible and potentially ruin it.  

    For storing your kayak or paddle board over the winter, your best bet is to purchase a Wall Mount Conversion Kit for your lift and storage rack (lift and rack sold separately). As long as you already have a “DockSider” Rack, these wall mount brackets are great for anyone who owns their own kayak and/or paddle board.

    With the brackets included in the conversion kit, you can mount your lift and rack right on your garage wall and safely store your equipment 20 inches off the floor, allowing you to keep other items underneath and maximize your storage space. Designed for easy installation and secure winter wall storage, when kayak season is over, you can mount your rack to the wall of your shed, garage, or spare room and keep your kayak or paddle board safe.

    This wall mount conversion kit comes with aluminum wall mount brackets and stainless-steel hardware. Simply secure these brackets onto the wall – either inside or outside –making sure they’re 32 inches apart, preferably on wall studs. Then mount your “DockSider” lift and storage rack to the wall and you’re all set. Don’t be unprepared at the end of this kayak season. Keep your equipment protected all winter long! Pick up some mounted kayak wall hangers for your “DockSider” Rack today.

    Filed Under: Blog, Kayak, Paddle Boards, Winter

    Next Page »

    Shopping Cart

    Shipping within New York State? We discount the Sales Tax amount! Use Coupon Code: Save the Sales Tax

    Why Choose Us?

    A Kayak Dock Rack & Lift
    that's Neat – Convenient – Affordable

    • Lift directly from the water!
    • Lift with a fraction of the weight!
    • Minimize rain entry!
    Stainless Steel Model available Great for Salt Water Harbors.

    Watch the Videos ›

    We ship via UPS

    Connect With Us Today:   Facebook   YouTube  YouTube

    Copyright © 2009-2025 Dock Craft · All Rights Reserved · Policies